Orchids, with their exotic blooms and elegant presence, bring a touch of the tropics to any indoor space. However, the real challenge, and perhaps the most crucial aspect of orchid ownership, begins *after* those beautiful flowers fade. Many orchid owners mistakenly believe that the end of blooming signals the end of the plant’s life, leading to premature disposal. Understanding *how to care for orchids indoors after flowering* is key to ensuring your orchid thrives and re-blooms in the future. This involves a shift in focus from admiring the blooms to providing the necessary conditions for the plant’s vegetative growth and subsequent flower production.
Understanding the Orchid’s Post-Bloom Needs
After flowering, orchids enter a period of dormancy, a time for rest and rejuvenation. This is not a time to panic, but rather a time to adjust your care routine to support the plant’s recovery. Key factors to consider include:
- Light: Orchids still need bright, indirect light, even after blooming. Avoid direct sunlight, which can scorch the leaves.
- Watering: Reduce watering frequency during dormancy. Overwatering is a common killer of orchids, especially when they are not actively growing. Let the potting mix dry out almost completely between waterings.
- Fertilizing: Reduce or stop fertilizing during dormancy. The plant is not actively growing and does not need as many nutrients.
- Temperature: Maintain consistent temperatures. Most orchids prefer temperatures between 65-80°F during the day and slightly cooler temperatures at night.
Specific Care Based on Orchid Type
The specific care requirements for your orchid after flowering will depend on the type of orchid you have. Here’s a look at the needs of two popular varieties:
Phalaenopsis (Moth Orchid)
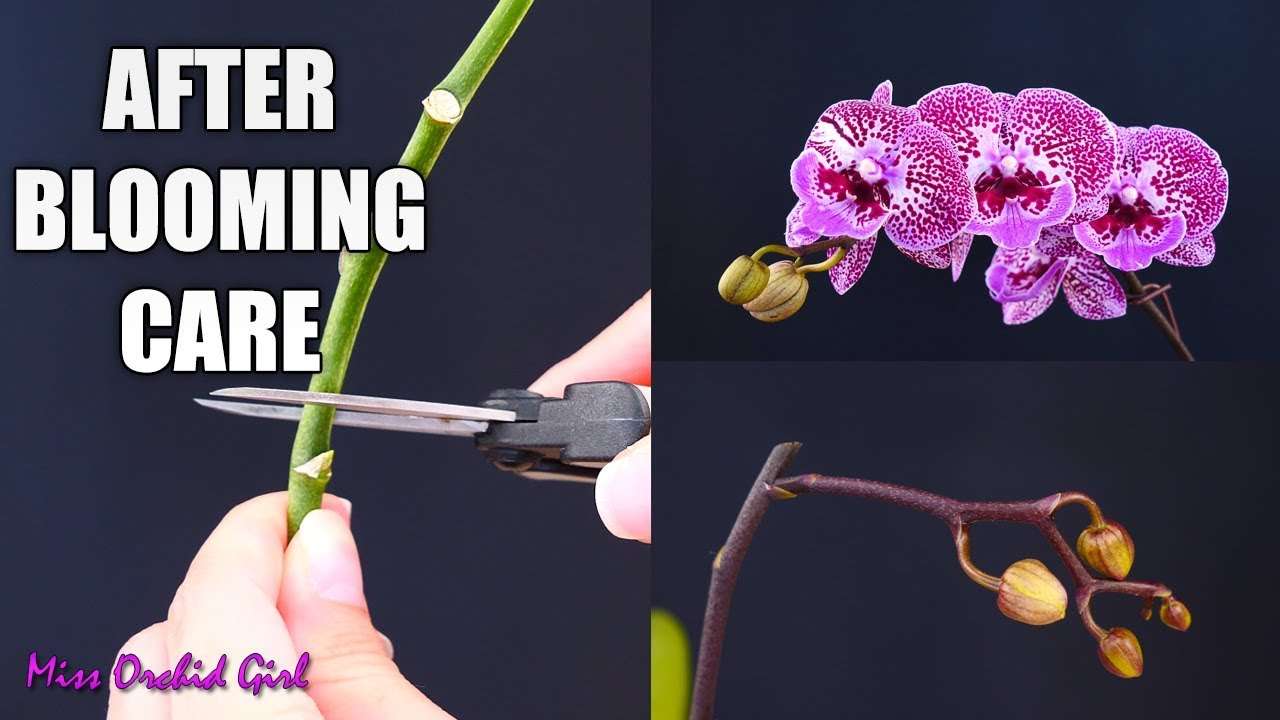
These are among the most common orchids and are relatively easy to care for. After the blooms fade, you can either cut the flower spike above a node (the small bump on the stem) or cut it off entirely at the base of the plant. Cutting above a node *may* encourage a new flower spike from that point, while cutting it off completely allows the plant to focus its energy on leaf and root growth. Reduce watering and fertilizing until new growth appears.
Cattleya
Cattleya orchids typically bloom once a year. After flowering, the pseudobulbs (the bulb-like structures at the base of the leaves) will remain. Do not cut these off, as they store energy for the plant. Reduce watering and fertilizing until new growth emerges from the base of the plant. Repotting may be necessary every 1-2 years, after flowering, using a well-draining orchid mix.
Troubleshooting Common Issues
Even with the best care, you may encounter some issues after your orchid flowers. Here are a few common problems and their solutions:
- Yellowing Leaves: This can be caused by overwatering, underwatering, or nutrient deficiencies. Adjust your watering and fertilizing practices accordingly.
- Root Rot: This is a serious problem caused by overwatering. Remove the plant from its pot, cut away any rotten roots, and repot in fresh orchid mix.
- Lack of Re-blooming: Patience is key! It can take several months or even a year for an orchid to re-bloom. Ensure you are providing the proper light, temperature, and humidity.
Learning *how to care for orchids indoors after flowering* can seem daunting at first, but with a little patience and attention to detail, you can enjoy these beautiful plants for many years to come. By understanding their needs during this crucial period, you’ll be well on your way to encouraging future blooms and a thriving orchid.
Successfully navigating the post-floral period of orchid cultivation necessitates a refined understanding of environmental manipulation and attentive observation. The transition from active bloom to a period of vegetative quiescence demands a recalibration of horticultural practices. Therefore, meticulous monitoring of the plant’s physiological responses is paramount to ensuring its sustained vitality and subsequent return to flowering.
OPTIMIZING ENVIRONMENTAL PARAMETERS
The post-floral environment plays a crucial role in the subsequent health and vigor of the orchid. Attention to detail regarding light, humidity, and air circulation is essential.
LIGHT MANAGEMENT
While direct solar irradiance should be strictly avoided, adequate indirect illumination remains critical for photosynthetic activity; The specific light intensity requirements will vary depending on the orchid species. A general guideline is to provide sufficient light to cast a faint shadow. Supplemental artificial lighting may be considered during periods of low ambient light levels, particularly in temperate climates during the winter months. The spectral quality of artificial lighting should favor the blue and red wavelengths, which are known to promote vegetative growth.
HUMIDITY CONTROL
Orchids, especially those of epiphytic origin, thrive in environments with elevated humidity. Maintaining a humidity level of 50-70% is generally recommended. This can be achieved through several methods, including the use of humidifiers, pebble trays filled with water, or grouping plants together to create a microclimate. Regular misting of the foliage can also provide temporary increases in humidity, but care should be taken to avoid prolonged leaf wetness, which can predispose the plant to fungal infections. Consistent monitoring of humidity levels using a hygrometer is advised.
AIR CIRCULATION
Adequate air circulation is vital to prevent stagnant conditions and minimize the risk of fungal or bacterial diseases. Gentle air movement around the plant facilitates transpiration, which helps to regulate temperature and nutrient uptake. A small fan can be used to provide air circulation, ensuring that the airflow is not directed directly at the plant, which can lead to desiccation. Proper spacing between plants is also important to allow for adequate air circulation.
REFINEMENT OF IRRIGATION AND FERTILIZATION STRATEGIES
The frequency and volume of irrigation, as well as the composition and concentration of fertilizer solutions, must be carefully adjusted during the post-floral phase. Overzealous application of either can be detrimental to the plant’s well-being.
WATERING REGIMEN
As previously mentioned, reduced watering is critical post-bloom. However, the precise frequency will depend on the potting medium, the ambient temperature, and the humidity levels. The “soak and dry” method is generally recommended, wherein the plant is thoroughly watered and then allowed to dry almost completely before the next watering. The potting medium should be assessed regularly for moisture content, and watering should be delayed if the medium is still damp. The use of rainwater or distilled water is preferable to tap water, which may contain excessive levels of salts or minerals.
FERTILIZATION PROTOCOL
During the dormant period, the nutrient requirements of the orchid are significantly reduced. Therefore, the application of fertilizer should be either discontinued entirely or reduced to a very dilute concentration (e.g., one-quarter strength). A balanced fertilizer formulation, with an N-P-K ratio of 20-20-20, is generally suitable. However, it is advisable to use a fertilizer specifically formulated for orchids, which typically contains micronutrients that are essential for healthy growth. The frequency of fertilization should be adjusted based on the plant’s growth rate and the composition of the potting medium. Over-fertilization can lead to salt buildup in the potting medium, which can damage the roots and inhibit growth.
Ultimately, successful orchid husbandry *how to care for orchids indoors after flowering* depends on a holistic approach that integrates a profound understanding of the plant’s physiological needs with meticulous attention to environmental control and prudent cultural practices. Through diligent observation and informed adjustments to care protocols, the orchid enthusiast can cultivate a thriving collection and ensure a recurring spectacle of floral elegance.