Skip to content
  • Home
  • Privacy Policy
  • FeedBack

singlehomeimprovements.com

Build & Home

  • Bathroom
  • Bedroom
  • Building
  • Kitchen
  • Water dispenser
  • Toggle search form

Troubleshooting Your Water Heater Thermostat

Posted on 10 March 2025 By Redactor

Troubleshooting a malfunctioning water heater can be a frustrating experience․ Often, the culprit is a faulty thermostat, responsible for regulating the water temperature․ Fortunately, you can diagnose this problem yourself with a simple multimeter test․ This guide will walk you through the process, providing clear instructions and safety precautions․

Table of Contents

Toggle
  • Understanding Your Water Heater Thermostat
    • Types of Water Heater Thermostats
  • Safety First: Essential Precautions
  • Gathering Your Equipment
  • Step-by-Step Testing Procedure
    • Step 1: Accessing the Thermostat
    • Step 2: Preparing the Multimeter
    • Step 3: Testing the Thermostat
    • Step 4: Testing the High-Limit Thermostat
    • Step 5: Interpreting the Results
  • Troubleshooting Common Issues
  • Replacing the Thermostat
  • Author

Understanding Your Water Heater Thermostat

Before diving into the testing procedure, it’s crucial to understand the role of the thermostat in your water heater․ This small but vital component acts as a temperature sensor and control switch․ It monitors the water temperature inside the tank and activates the heating element when the temperature drops below the set point․ A malfunctioning thermostat can lead to inconsistent water temperatures, either too hot or too cold, or even prevent the heater from working altogether․

Types of Water Heater Thermostats

Water heaters typically employ two thermostats: a high-limit thermostat and a regular thermostat․ The regular thermostat controls the desired water temperature, while the high-limit thermostat acts as a safety device, shutting off the power if the water temperature gets dangerously high․ Testing both is advisable for a thorough diagnosis․

Identifying the specific type of thermostat in your water heater is important, as the testing procedures may differ slightly․ While most modern water heaters utilize simple, easily replaceable thermostats, older models may have more complex setups․

Safety First: Essential Precautions

Working with electrical appliances always carries inherent risks․ Before commencing any testing, ensure you disconnect the power supply to the water heater completely․ This is paramount for your safety and prevents accidental electric shock․ Turn off the breaker at the electrical panel that controls the water heater․ Never assume the power is off; always double-check․

  • Turn off the power: Locate the breaker controlling your water heater and switch it to the “OFF” position․
  • Allow time for cooling: Wait for at least 30 minutes to allow the water heater to cool down significantly․ Hot water can cause serious burns․
  • Use insulated tools: If you need to use any tools, ensure they have insulated handles to prevent electric shock․
  • Work in a well-lit area: Good visibility is essential to avoid mistakes and potential injuries․

Gathering Your Equipment

To effectively test your water heater thermostat, you’ll need a few essential tools․ The most crucial piece of equipment is a multimeter, a device used to measure electrical properties such as voltage, current, and resistance․ You will also need a screwdriver (likely a Phillips head) to access the thermostat and potentially some wire strippers, although this depends on your water heater’s specific wiring․

Step-by-Step Testing Procedure

Once you’ve gathered your tools and taken the necessary safety precautions, you can proceed with the testing․ The process involves using the multimeter to measure the continuity of the thermostat’s contacts․ Continuity refers to the ability of electricity to flow through a circuit․ If the thermostat is functioning correctly, it will allow electricity to flow when the temperature is below the set point and will interrupt the flow when the temperature is reached․

Step 1: Accessing the Thermostat

Locate your water heater’s thermostat․ The location varies depending on the model and manufacturer․ Consult your water heater’s manual for the exact location․ Once you’ve found it, carefully remove the access panel using a screwdriver․ You might find it necessary to drain some water from the tank to make access easier, depending on the design․

Step 2: Preparing the Multimeter

Set your multimeter to the ohms (Ω) setting․ This allows you to measure the resistance across the thermostat’s terminals․ Ensure the leads are securely connected to the multimeter․

Step 3: Testing the Thermostat

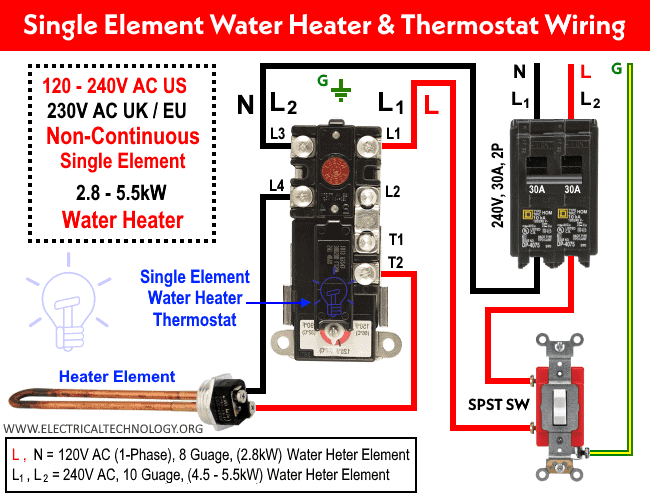
Carefully probe the multimeter leads to the thermostat’s terminals․ Consult your water heater’s wiring diagram to identify the correct terminals․ There will typically be two terminals for the regular thermostat․ A reading of near zero ohms indicates continuity, suggesting the thermostat is closed (allowing current to flow)․ A reading of infinite ohms indicates the circuit is open (no current flow)․

Repeat this step at different temperatures to observe how the resistance changes․ The resistance should change as the temperature changes․ If the resistance remains consistent regardless of temperature, then the thermostat is likely faulty․

Step 4: Testing the High-Limit Thermostat

Repeat steps 2 and 3 for the high-limit thermostat․ This thermostat typically has two terminals as well․ The high-limit thermostat should normally have a high resistance reading, indicating that the circuit is open at normal operating temperatures․ It closes only when the temperature exceeds the high-limit setpoint, thereby shutting off power and preventing overheating․

Step 5: Interpreting the Results

Analyze the readings obtained from both thermostats․ If either thermostat shows incorrect resistance readings (e․g․, infinite ohms at normal operating temperatures for the regular thermostat or near zero ohms for the high-limit thermostat at normal operating temperatures), it indicates a faulty thermostat and requires replacement․

Troubleshooting Common Issues

Even with careful testing, you might encounter some unexpected results․ If you get inconsistent readings or if your thermostat appears to be functioning correctly but your water heater still isn’t working properly, consider these possibilities:

  • Faulty heating element: The heating element itself might be the problem, even if the thermostat is working correctly․ Testing the heating element’s continuity is a necessary next step․
  • Wiring problems: Loose or damaged wiring can also lead to malfunctioning․ Carefully inspect all wiring connections for any signs of damage or corrosion․
  • Incorrect multimeter settings: Double-check your multimeter settings to ensure accurate measurements․ Incorrect settings can lead to misleading results․
  • Faulty anode rod (if applicable): A severely corroded anode rod can cause premature thermostat failure in some water heater models․ Replacing it may resolve the issue․

Replacing the Thermostat

If your testing confirms a faulty thermostat, replacing it is usually straightforward․ However, it’s crucial to follow the manufacturer’s instructions carefully․ Replacing a thermostat incorrectly can lead to further damage or even safety hazards․ If you’re unsure about any aspect of the replacement process, it’s always best to consult a qualified plumber or electrician․

Remember to always disconnect the power supply before attempting any repairs or replacements․ After installing the new thermostat, reconnect the power and test the water heater to ensure it’s functioning correctly․ Monitor the water temperature closely for a while to ensure the new thermostat is working as expected․

Testing a water heater thermostat with a multimeter is a valuable skill for any homeowner․ By following these steps carefully and taking the necessary safety precautions, you can diagnose potential problems and save yourself the cost of unnecessary repairs․ This allows you to confidently determine if the problem lies within the thermostat itself or if further investigation is required․ Thorough testing, coupled with a systematic approach, will help you solve your water heater’s temperature issues quickly and efficiently․ This is a fundamental aspect of water heater maintenance that empowers you to tackle common problems effectively․ With a little patience and attention to detail, you can restore your water heater to its optimal performance․

Author

  • Redactor
    Redactor

    Daniel Carter is a seasoned expert in construction and home renovation with over 15 years of hands-on experience in the industry. From small DIY projects to large-scale renovations, he has worked with a wide range of materials, techniques, and design trends, helping homeowners bring their ideas to life. Daniel’s passion for building started in his childhood when he helped his family renovate their home. Over the years, this passion turned into a profession, leading him to explore everything from architectural design to energy-efficient solutions. On Build & Renovate Hub, Daniel shares expert advice, step-by-step guides, and in-depth reviews of construction materials, tools, and techniques. Whether you’re planning a complete home remodel or just looking for practical maintenance tips, his goal is to make the renovation process easier, more efficient, and cost-effective for everyone.

    View all posts

Related posts:

  1. Testing Your Electric Water Heater Thermostat
  2. Troubleshooting Your Electric Water Heater Thermostat
  3. Troubleshooting a Faulty Gas Water Heater Thermostat
  4. Adjusting Your Water Heater Temperature: A Comprehensive Guide
  5. Troubleshooting Your Dometic RV Water Heater: A Comprehensive Guide
  6. Testing Your Water Heater Element: A Step-by-Step Guide
  7. Understanding Your Honeywell Water Heater Thermostat
  8. Troubleshooting a Water Heater Element Without a Multimeter
Water dispenser

Post navigation

Previous Post: Building a 12×12 Shed: A Comprehensive Guide to Materials
Next Post: Designing the Perfect 2-Bedroom Small House

More Related Articles

Troubleshooting Cold Water Heater Issues: A Comprehensive Guide Water dispenser
Rheem Professional Classic Rtex: A Comprehensive Guide Water dispenser
Choosing the Right Recirculating Pump for Your Tankless Water Heater Water dispenser
Yearly Cost Gas vs Electric Tankless Water Heater A Comprehensive Comparison Water dispenser
The Anatomy of a Conventional Water Heater Water dispenser
Commercial Tankless Water Heaters for Restaurants: A Comprehensive Guide Water dispenser

Tag Cloud

Your browser doesn't support the HTML5 CANVAS tag.

  • Kitchen
  • Uncategorised
  • Bedroom
  • Bathroom
  • Building
  • Water dispenser

Recent Posts

  • Modern Dressing Table Designs for Bedroom with Price
  • Troubleshooting a GE Profile Refrigerator Water Dispenser
  • Kitchen Island with Farmhouse Sink and Dishwasher
  • Bathroom Tub Surround Tile Design Ideas
  • Maytag Optimal Dose Dispenser Filling with Water: Causes and Solutions

Copyright © 2025 singlehomeimprovements.com.

Powered by PressBook Blog WordPress theme