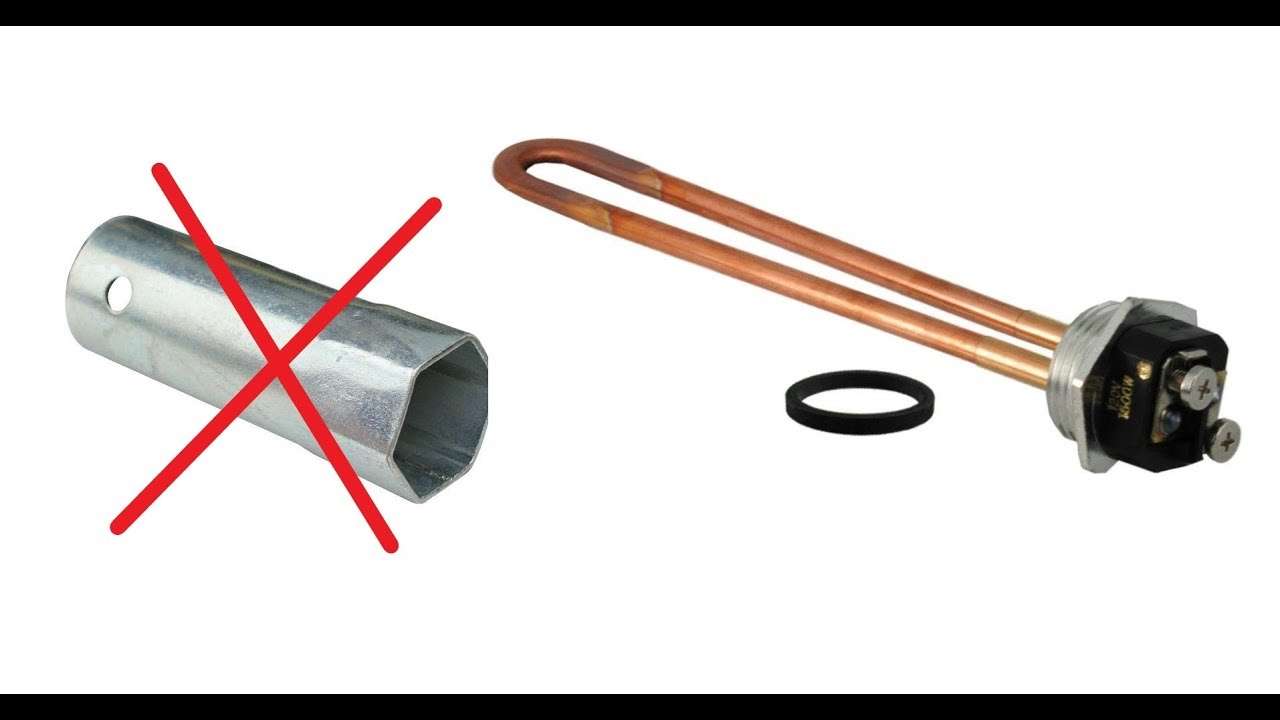
Removing a water heater element can seem daunting, especially when you realize you’re missing a crucial tool: an element wrench․ However, fear not! You don’t necessarily need specialized equipment to tackle this task․ With a little ingenuity and some common household tools, you can often successfully remove the stubborn element․ This article will guide you through alternative methods for removing your **water heater element** safely and effectively without relying on a dedicated wrench, ensuring you can get your hot water back up and running in no time․ Understanding the different methods for removing the **water heater element** ensures you have options when facing this situation․
Understanding the Challenge: Why Element Wrenches are Preferred
Element wrenches are designed specifically to grip the element’s hex head securely, providing the leverage needed to break it free from the tank․ Over time, mineral deposits and corrosion can cause the element to become tightly bonded to the tank, making removal difficult․ Using an element wrench distributes force evenly, minimizing the risk of damaging the element or the tank․
Alternative Methods for Removing the Element
Using a Socket Wrench (with Modifications)
A standard socket wrench can work, but it likely won’t fit directly over the element․ Here’s how to modify it:
- Identify the Correct Socket Size: Measure the element’s hex head to determine the appropriate socket size․
- Grind Down the Socket (If Necessary): The socket walls might be too thick to fit into the recessed area around the element․ Use a grinder (carefully!) to thin the socket walls until it fits snugly․
- Use a Breaker Bar: Attach a breaker bar to the socket wrench for increased leverage․
Channel-Lock Pliers (Approach with Caution)
Channel-lock pliers offer a strong grip, but they can easily damage the element’s hex head if used improperly․ This method should be a last resort․
- Adjust the Pliers: Open the pliers wide enough to securely grip the element’s hex head․
- Apply Steady Pressure: Squeeze the pliers tightly and slowly try to turn the element counterclockwise․
- Protect the Element: Wrap the element’s hex head with a rag or rubber padding to minimize damage from the pliers’ teeth․
Hammer and Chisel (Use as a Last Resort)
This is the most aggressive method and carries the highest risk of damage․ Only use it if all other options have failed․ Wear safety glasses!
- Position the Chisel: Place the chisel at an angle against one of the element’s hex head corners․
- Tap with a Hammer: Gently tap the chisel with a hammer, trying to rotate the element counterclockwise․ Move the chisel around the hex head, tapping lightly each time․
- Be Patient: Avoid hitting the chisel too hard, as this could damage the tank threads․
Important Considerations Before You Begin
- Safety First: Always turn off the power and water supply to the water heater before attempting any repairs․
- Drain the Tank: Drain the water heater tank completely to prevent water damage․
- Penetrating Oil: Apply penetrating oil around the element’s threads and let it soak for several hours (or even overnight) to help loosen it․
Comparative Table of Methods
| Method | Pros | Cons | Risk of Damage |
|---|---|---|---|
| Modified Socket Wrench | Good leverage, relatively safe․ | Requires socket modification․ | Low |
| Channel-Lock Pliers | Readily available․ | Can damage the element․ | Medium |
| Hammer and Chisel | Last resort option․ | High risk of damage to element and tank․ | High |