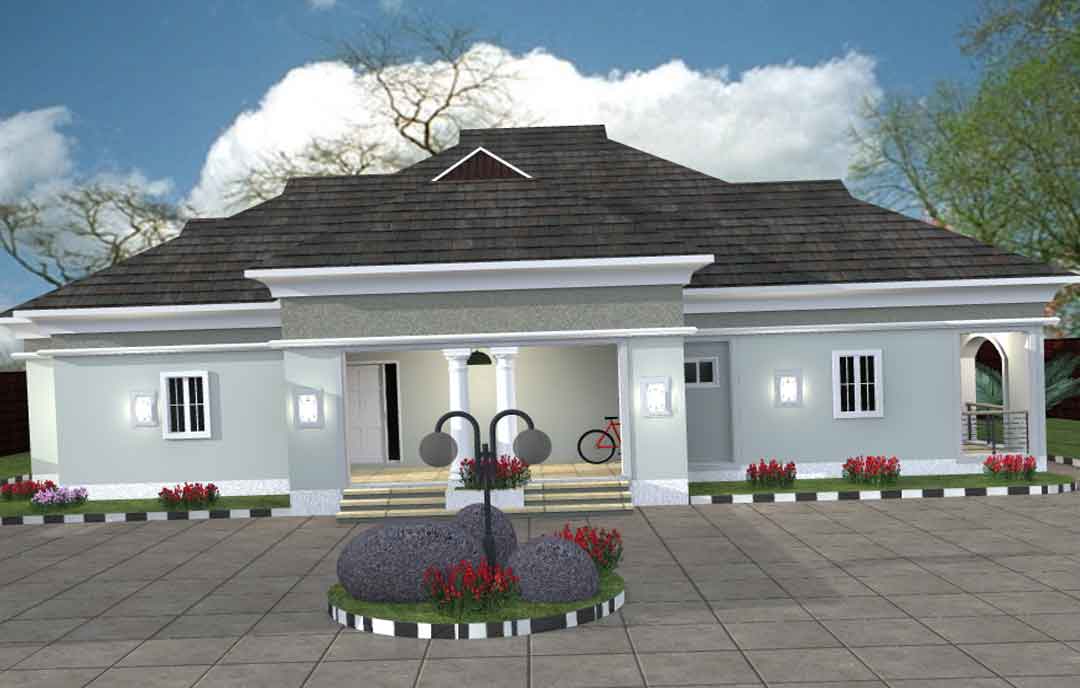
The demand for spacious and comfortable family homes in Nigeria continues to rise‚ leading to innovative architectural designs that cater to specific needs and preferences. A 4 bedroom bungalow architectural design in Nigeria presents a compelling option for families seeking single-story living with ample space. This type of design offers accessibility‚ ease of maintenance‚ and the potential for beautiful landscaping‚ all while providing a sense of security and community. Exploring the nuances of a 4 bedroom bungalow architectural design in Nigeria reveals a spectrum of styles‚ from modern minimalist aesthetics to traditional layouts infused with contemporary touches.
Key Considerations for Designing Your 4 Bedroom Bungalow
Designing a bungalow requires careful consideration of space utilization‚ natural light‚ ventilation‚ and the overall flow of the house. Here are some crucial elements to keep in mind:
- Space Optimization: Bungalows benefit from open-plan living areas that maximize the feeling of spaciousness.
- Natural Light: Large windows and strategically placed skylights can brighten the interior and reduce the need for artificial lighting.
- Ventilation: Proper ventilation is essential in the Nigerian climate. Consider incorporating cross-ventilation strategies and utilizing high ceilings.
- Accessibility: Bungalows are inherently more accessible than multi-story homes‚ making them ideal for families with young children or elderly members.
- Landscaping: A well-designed landscape can enhance the curb appeal of your bungalow and provide outdoor living spaces.
Popular Architectural Styles for Nigerian Bungalows
Several architectural styles are well-suited for 4-bedroom bungalows in Nigeria. The choice depends largely on personal preference and budget.
Modern Minimalist
This style emphasizes clean lines‚ simple forms‚ and a focus on functionality. It often incorporates large windows‚ open floor plans‚ and a neutral color palette.
Traditional Nigerian
This style draws inspiration from traditional Nigerian architecture‚ featuring elements such as courtyards‚ thatched roofs (though often adapted with modern materials)‚ and earth-toned colors. These designs often prioritize natural ventilation and shading.
Contemporary Hybrid
This style blends elements of modern and traditional design‚ creating a unique and aesthetically pleasing home. It might incorporate features like a modern open floor plan with traditional Nigerian patterns and materials.
Example Floor Plan Considerations
Imagine a floor plan that prioritizes both communal living and private retreats. The living room and dining area flow seamlessly together‚ creating a central gathering space. The kitchen‚ ideally with an island‚ is positioned for easy access and interaction. The master bedroom is a sanctuary‚ complete with an en-suite bathroom and walk-in closet. The remaining three bedrooms are strategically placed to offer privacy and comfort.
Budgeting for Your Bungalow Project
Building a 4-bedroom bungalow in Nigeria requires careful budgeting; Factors to consider include:
- Land Acquisition: The cost of land can vary significantly depending on location.
- Architectural Design Fees: Engaging a qualified architect is crucial for creating a well-designed and functional home.
- Construction Costs: These include materials‚ labor‚ and permits.
- Finishing Costs: These include flooring‚ painting‚ fixtures‚ and landscaping.
Ultimately‚ the success of a 4 bedroom bungalow architectural design in Nigeria hinges on meticulous planning‚ a clear vision‚ and a collaborative approach between the homeowner‚ architect‚ and construction team. With careful attention to detail and a focus on creating a comfortable and functional living space‚ you can build a dream home that meets the needs of your family for years to come.
SUSTAINABLE DESIGN CONSIDERATIONS
In contemporary architectural practice‚ sustainability has transcended being a mere trend and evolved into a fundamental principle. Incorporating sustainable design elements into a 4-bedroom bungalow in Nigeria not only minimizes environmental impact but also enhances the long-term value and efficiency of the property. Passive cooling strategies‚ such as optimized building orientation to mitigate solar gain and the utilization of natural ventilation‚ are paramount. Moreover‚ the selection of locally sourced‚ renewable building materials reduces the carbon footprint associated with transportation. The integration of rainwater harvesting systems and solar energy panels further contributes to the property’s self-sufficiency and reduces reliance on conventional utilities.
MATERIAL SELECTION AND ENVIRONMENTAL IMPACT
The choice of construction materials significantly influences the environmental performance of the bungalow. Utilizing materials with low embodied energy‚ such as stabilized earth blocks or sustainably harvested timber‚ is highly recommended. Furthermore‚ incorporating recycled materials‚ where feasible‚ minimizes waste and promotes a circular economy. Proper insulation‚ constructed from eco-friendly materials‚ reduces energy consumption for heating and cooling‚ leading to lower utility bills and a smaller environmental footprint. The careful consideration of material lifecycle‚ from extraction to disposal‚ is essential for achieving a truly sustainable design.
NAVIGATING REGULATORY REQUIREMENTS AND BUILDING CODES
Adherence to local regulatory requirements and building codes is a non-negotiable aspect of any construction project. In Nigeria‚ various regulations govern building design‚ construction practices‚ and environmental standards. Engaging with local authorities and obtaining the necessary permits before commencing construction is crucial to avoid legal complications and ensure compliance. Building codes typically address structural integrity‚ fire safety‚ and accessibility‚ ensuring the safety and well-being of occupants. Furthermore‚ adherence to environmental regulations minimizes pollution and protects natural resources.
ENHANCING PROPERTY VALUE THROUGH DESIGN EXCELLENCE
A well-designed 4-bedroom bungalow not only provides a comfortable living space but also significantly enhances the property’s market value. Aesthetically pleasing designs‚ incorporating high-quality materials and meticulous craftsmanship‚ command premium prices in the real estate market; Moreover‚ incorporating modern amenities‚ such as smart home technology and energy-efficient appliances‚ further increases the property’s appeal to potential buyers. Investing in professional landscaping and creating inviting outdoor living spaces adds to the overall value and desirability of the bungalow. Indeed‚ a thoughtfully designed and meticulously executed bungalow represents a sound investment with the potential for long-term appreciation. This underscores the importance of skilled architects when planning your 4 bedroom bungalow architectural design in Nigeria.