The question of whether to turn off your electric water heater when the water supply is interrupted is a common one, often met with varying opinions and a little confusion․ Understanding the potential risks and benefits of either approach is crucial for maintaining your appliance and preventing costly damage․ Ignoring this issue can lead to serious consequences, so it’s important to consider the factors involved and make an informed decision․ Therefore, let’s delve into the reasons why turning off your **electric water heater if water turned off** might be the best course of action․
The Potential Dangers of Running Dry
The primary reason to consider turning off your electric water heater when the water supply is cut off is to prevent damage to the heating elements․ These elements are designed to be submerged in water, which acts as a coolant․ When the tank is empty, or significantly low, the elements can overheat rapidly, leading to:
- Burnout: The heating elements can literally burn out, requiring replacement․ This is the most common issue․
- Tank Damage: Extreme heat can warp or even crack the tank itself, necessitating a complete replacement of the water heater․
- Fire Hazard: In rare but serious cases, overheating elements can pose a fire risk․
Why Water Acts as a Coolant
Water’s high specific heat capacity allows it to absorb a significant amount of heat without experiencing a dramatic temperature increase․ This property is essential for the safe operation of an electric water heater․ When the elements are submerged, the water efficiently dissipates the heat they generate․ Without water, the elements are left to bake in their own heat, quickly exceeding their safe operating temperature․
When is it Safe to Leave it On?
While it’s generally advisable to turn off your electric water heater, there are a few situations where it *might* be less critical:
- Short Interruptions: If you know the water shut-off will be for a very brief period (e․g․, a few minutes for a minor repair), the residual water in the tank may provide enough cooling․
- Tankless Heaters: Tankless water heaters only heat water on demand․ If there’s no water flowing, they won’t activate, eliminating the risk of damage․
However, Err on the Side of Caution
Even if you believe the interruption will be brief, it’s always best to err on the side of caution․ Turning off the breaker to the water heater is a simple task that can prevent significant damage․ It’s a small price to pay for peace of mind and the longevity of your appliance․ Furthermore, remember to turn the breaker back on *after* the water supply has been fully restored and the tank is completely refilled to prevent element burnout․
Practical Steps to Take
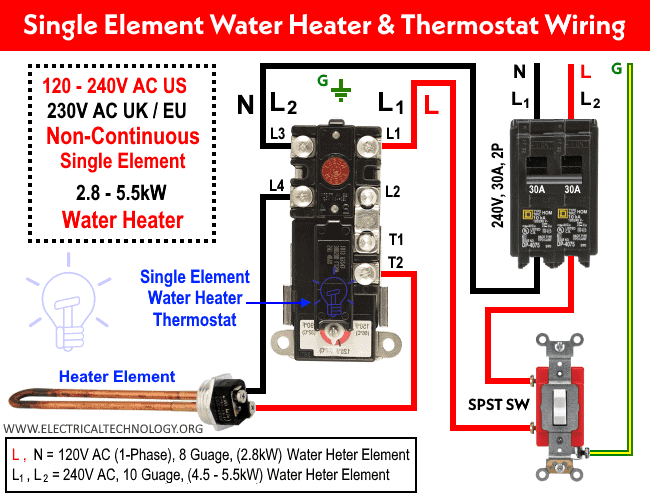
- Identify the Breaker: Locate the circuit breaker in your electrical panel that controls the electric water heater․ It will usually be labeled․
- Turn Off the Breaker: Flip the breaker to the “off” position․
- Restore Power: Once the water supply is restored and the tank is full, turn the breaker back on․
ADDITIONAL CONSIDERATIONS
Beyond the immediate risk of element burnout, there are other aspects to consider when dealing with a water shut-off․ These can further impact the longevity and efficiency of your electric water heater․
– Sediment Accumulation: When the water is turned off, any sediment at the bottom of the tank can settle and harden․ Upon restoring water flow, this sediment can be stirred up and potentially clog pipes or affect the heating elements․ Regular flushing of your water heater can minimize this risk․
– Water Quality: Depending on the source of the water and the age of your pipes, a water shut-off can sometimes dislodge rust or other contaminants․ While not directly related to the water heater itself, these contaminants can affect the overall water quality in your home․ It’s advisable to run the water for a few minutes after the shut-off to clear any potential debris․
– Insurance Implications: In some cases, neglecting to properly maintain your appliances, including failing to turn off an electric water heater during a water shut-off, could potentially affect insurance claims related to water damage or appliance failure․ Always check your policy for specific details․
LONG-TERM WATER HEATER HEALTH
Taking care of your electric water heater is an investment in the long-term comfort and functionality of your home․ By proactively addressing potential issues and implementing simple preventative measures, you can significantly extend the lifespan of your appliance and avoid costly repairs․ Consider these additional tips:
– Annual Maintenance: Schedule an annual inspection and maintenance check with a qualified plumber․ They can identify potential problems early and ensure your water heater is operating efficiently․
– Temperature Settings: Avoid setting the water temperature too high․ A setting of 120°F (49°C) is generally sufficient for most households and can help prevent scalding and reduce energy consumption․
– Insulation: Insulating your water heater can help reduce heat loss and lower energy bills, especially in colder climates․
By being mindful of these factors and making informed decisions, you can ensure your electric water heater continues to provide reliable hot water for years to come․ Remember, a little proactive maintenance goes a long way in preventing unexpected problems and maximizing the value of your appliance․ It’s a smart move to consider the points listed here to have a positive impact on the life and function of your **electric water heater if water turned off**․
TROUBLESHOOTING COMMON POST-SHUTOFF ISSUES
After turning the water back on and powering up your electric water heater, you might encounter a few common issues․ Knowing how to troubleshoot these problems can save you a call to a plumber․
– No Hot Water: If the water isn’t heating up after a reasonable time (30 minutes to an hour), double-check that the breaker is indeed on and that the thermostat on the water heater is properly set․ Sometimes, a tripped thermal overload switch (usually a small reset button on the water heater) can be the culprit․
– Cloudy or Discolored Water: This is often a temporary issue caused by air bubbles or sediment being stirred up․ Run the hot water from a faucet for several minutes until it clears․ If it persists, there might be a more serious problem like rust in your pipes․
– Strange Noises: Rumbling or popping sounds can indicate sediment buildup at the bottom of the tank․ Flushing the tank can often resolve this issue․ If the noises are persistent or unusual, consult a plumber․
BEYOND ELECTRIC: GAS WATER HEATERS
While this article focuses on electric water heaters, it’s worth briefly mentioning gas water heaters․ The risks associated with a water shut-off are different for gas units․ While you don’t have the risk of heating element burnout, a prolonged shut-off can potentially affect the gas pilot light․ After the water is restored, you might need to relight the pilot; Always follow the manufacturer’s instructions for relighting a gas water heater pilot light․ If you’re uncomfortable doing so, contact a qualified technician․
SMART WATER HEATER TECHNOLOGY
Modern smart water heaters offer features that can simplify water shut-off management․ Some models can automatically detect a drop in water pressure and shut off the heating element to prevent damage․ Others can be controlled remotely via a smartphone app, allowing you to easily turn them off and on as needed․ Consider upgrading to a smart water heater for enhanced control and peace of mind․
PREVENTATIVE MEASURES: A SUMMARY
In conclusion, while the decision to turn off your electric water heater during a water shut-off ultimately rests with you, understanding the potential risks and benefits is paramount․ By taking proactive steps, you can safeguard your appliance and avoid costly repairs․ The key takeaway is this: If you are faced with turning off **electric water heater if water turned off**, it is almost always the safest and most prudent action to take․