Installing a tankless water heater can significantly improve energy efficiency and provide on-demand hot water‚ but ensuring a proper installation is crucial for optimal performance and longevity. A key component of this process is utilizing a 3/4 in. tankless water heater valves installation kit. These kits offer a convenient and reliable way to connect your tankless water heater to your plumbing system‚ providing essential shut-off valves for maintenance and future repairs. Choosing the right kit and understanding the installation process are vital steps towards a successful and hassle-free experience. This guide will provide a comprehensive overview of selecting‚ installing‚ and maintaining your 3/4 in. tankless water heater valves installation kit.
Why Use a Dedicated Installation Kit?
While it might be tempting to piece together your own valve system‚ using a dedicated installation kit offers several advantages:
- Convenience: Kits contain all the necessary components in one package‚ saving you time and effort in sourcing individual parts.
- Compatibility: Kits are designed specifically for tankless water heaters‚ ensuring proper fit and function.
- Reliability: Pre-selected components ensure compatibility and minimize the risk of leaks or failures.
- Ease of Installation: Kits often include detailed instructions and diagrams‚ simplifying the installation process.
Choosing the Right Kit
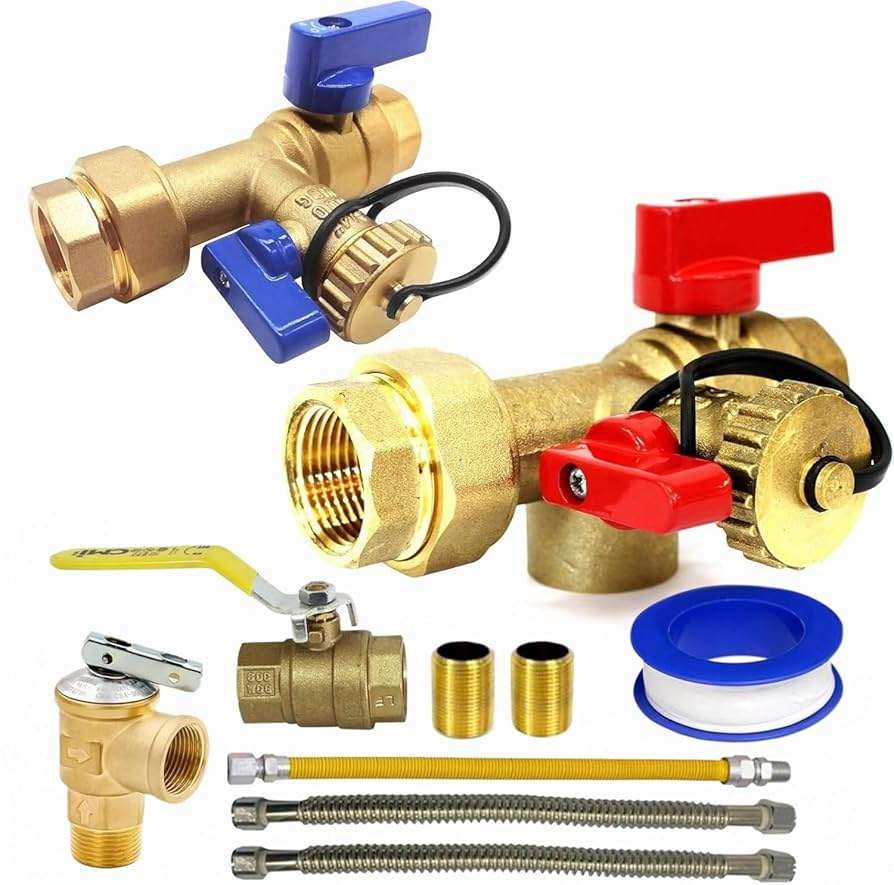
Selecting the appropriate 3/4 in. tankless water heater valves installation kit is essential for a successful installation. Consider the following factors:
Material:
- Brass: Durable‚ corrosion-resistant‚ and suitable for most applications. A common choice for reliability.
- Stainless Steel: Offers superior corrosion resistance‚ especially in environments with hard water or harsh chemicals.
Valve Type:
- Ball Valves: Provide quick and reliable shut-off with a simple quarter-turn operation.
- Gate Valves: Offer more precise flow control but may be more prone to leaks over time.
Components Included:
Ensure the kit includes the following essential components:
- Hot and Cold Water Shut-Off Valves
- Pressure Relief Valve (PRV) Connection
- Service Ports for Flushing and Maintenance
- Union Connections for Easy Disconnection
Installation Process (General Overview)
- Turn off the water supply: Locate the main water shut-off valve and turn it off completely.
- Drain the existing water heater (if applicable): If replacing an existing water heater‚ drain the tank completely.
- Prepare the plumbing connections: Clean and prepare the existing plumbing pipes for connection.
- Install the 3/4 in. tankless water heater valves installation kit: Follow the manufacturer’s instructions to connect the valves to the plumbing system‚ ensuring proper alignment and tightening of connections.
- Connect the tankless water heater: Connect the water heater to the valves using the appropriate fittings.
- Test for leaks: Slowly turn on the water supply and check for leaks around all connections. Tighten any connections as needed.
Maintenance and Troubleshooting
Regular maintenance is crucial for ensuring the longevity of your tankless water heater and valve system. Flush the system periodically to remove sediment and scale buildup. Inspect the valves regularly for leaks or corrosion. If you experience any problems‚ consult a qualified plumber or HVAC professional.
The proper selection and installation of a 3/4 in. tankless water heater valves installation kit are essential for the efficient and reliable operation of your tankless water heater. By following the guidelines outlined above‚ you can ensure a successful installation and enjoy the benefits of on-demand hot water for years to come.