Understanding the intricacies of 120 volt single element water heater thermostat wiring is crucial for both safety and the efficient operation of your water heating system․ Proper wiring ensures that your water heater functions as intended, providing hot water on demand without posing a risk of electrical hazards․ Ignoring the correct wiring diagrams and procedures can lead to inefficient heating, damage to the unit, and even dangerous situations such as short circuits or electrical fires․ Therefore, a thorough understanding of 120 volt single element water heater thermostat wiring is essential before attempting any installation or repair work․
Understanding the Basic Components
Before diving into the wiring process, it’s important to familiarize yourself with the key components involved:
- Thermostat: This device regulates the water temperature by switching the heating element on and off as needed․
- Heating Element: This component heats the water in the tank;
- Power Supply: A dedicated 120-volt circuit provides the necessary electricity․
- Wiring: Wires connect the components and carry the electrical current․
Wiring Diagram and Steps
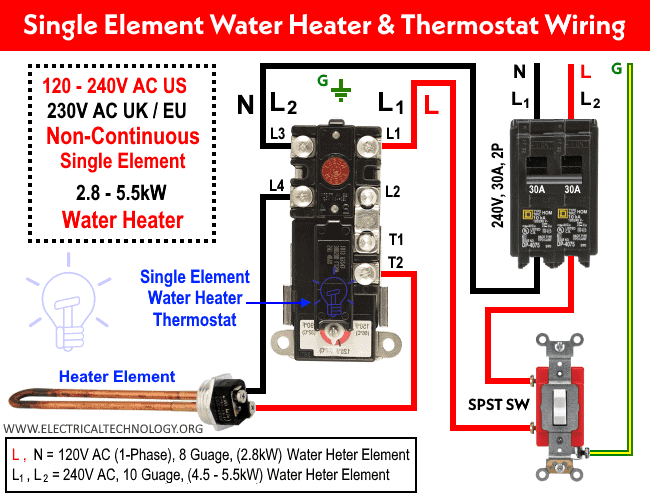
While specific wiring diagrams may vary slightly depending on the water heater model, the general principles remain the same․ Always consult the manufacturer’s instructions for your specific unit․ However, here’s a general overview:
- Disconnect the Power: This is the most important step! Turn off the circuit breaker supplying power to the water heater․ Double-check with a voltage tester to ensure the power is off․
- Access the Thermostat: Remove the access panel(s) to expose the thermostat and wiring․
- Identify the Wires: Typically, you’ll find a black (hot) wire, a white (neutral) wire, and a green or bare copper (ground) wire․
- Connect the Wires:
- Connect the black (hot) wire to the “L1” or “Line” terminal on the thermostat․
- Connect the white (neutral) wire to the “N” or “Neutral” terminal on the thermostat․
- Connect the ground wire to the grounding screw or terminal on the water heater․
- Connect the Thermostat to the Heating Element: The thermostat will have wires that connect directly to the heating element terminals․ Ensure these connections are secure․
- Replace the Access Panel(s): Carefully replace the access panel(s) after ensuring all wiring is secure and correctly connected․
- Restore the Power: Turn the circuit breaker back on․
Troubleshooting Common Wiring Issues
If your water heater isn’t working after wiring the thermostat, consider these common issues:
- Loose Connections: Ensure all wires are securely connected to their respective terminals․
- Incorrect Wiring: Double-check the wiring diagram to ensure the wires are connected correctly․
- Faulty Thermostat: The thermostat itself might be defective․ Test it with a multimeter․
- Blown Fuse or Tripped Breaker: A short circuit could have caused a fuse to blow or a breaker to trip․
Safety Precautions
Working with electricity can be dangerous․ Always follow these safety precautions:
- Disconnect Power: Always disconnect the power before working on any electrical components․
- Use Appropriate Tools: Use insulated tools designed for electrical work․
- Wear Safety Gear: Wear safety glasses and gloves․
- Consult a Professional: If you’re not comfortable working with electricity, consult a qualified electrician․
Proper 120 volt single element water heater thermostat wiring ensures efficient and safe operation․ Following the steps outlined above, and always prioritizing safety, will help you keep the hot water flowing․ If you encounter any difficulties or are unsure about any aspect of the process, don’t hesitate to call in a professional․
ADVANCED CONSIDERATIONS FOR THERMOSTAT SELECTION AND INSTALLATION
Beyond the fundamental wiring procedures, discerning professionals recognize the importance of selecting a thermostat commensurate with the specific demands of the installation environment and operational parameters․ Thermostats are not monolithic; variations exist in terms of temperature range, sensitivity, and inherent safety features․ A thermostat designed for a high-demand commercial application, for instance, would likely possess a more robust construction and enhanced safety mechanisms compared to a basic residential unit; Moreover, the method of installation warrants meticulous attention․ The thermostat should be securely mounted and properly insulated to prevent spurious temperature readings influenced by ambient conditions․ Failure to adhere to these principles can compromise the accuracy of temperature regulation and potentially lead to premature component failure․
OPTIMIZING ENERGY EFFICIENCY THROUGH THERMOSTAT PROGRAMMING
In contemporary installations, programmable thermostats represent a compelling avenue for enhancing energy efficiency and mitigating operational costs․ These devices facilitate the scheduling of temperature settings based on anticipated usage patterns, thereby preventing unnecessary heating during periods of inactivity․ Sophisticated models offer features such as remote control via networked devices and adaptive learning algorithms that optimize schedules based on observed user behavior․ Implementing a programmable thermostat can contribute significantly to reducing energy consumption and minimizing the environmental impact of water heating systems․ However, the efficacy of such systems is predicated on accurate programming and a thorough understanding of the user’s hot water consumption profile․
DIAGNOSTIC PROCEDURES AND PREVENTATIVE MAINTENANCE
Even with meticulous installation, periodic diagnostic procedures and preventative maintenance are indispensable for ensuring the long-term reliability and optimal performance of a 120-volt single element water heater․ Regular inspection of wiring connections for corrosion or loosening is paramount․ The thermostat itself should be periodically tested for accuracy using a calibrated thermometer․ Furthermore, sediment accumulation within the water heater tank can impede heat transfer and reduce efficiency․ Periodic flushing of the tank is recommended to mitigate this issue․ The frequency of these maintenance tasks will vary depending on water quality and usage patterns․ In areas with hard water, more frequent flushing may be necessary․ Adherence to a structured maintenance schedule will not only prolong the lifespan of the water heater but also minimize the likelihood of unexpected failures and costly repairs․ The ultimate goal is to maintain the 120 volt single element water heater thermostat wiring in optimal condition․
