The concept of a master bedroom en suite bathroom transforms the everyday routine into a luxurious experience. It’s more than just convenience; it’s about creating a private sanctuary where relaxation and functionality seamlessly blend. When considering master bedroom en suite bathroom designs‚ homeowners often seek a space that reflects their personal style and meets their specific needs. These designs can range from minimalist and modern to opulent and traditional‚ each offering a unique interpretation of the ideal private retreat. The key is to find the perfect balance between aesthetics and practicality to create a space that enhances both the beauty and value of your home.
Planning Your Perfect En Suite: Considerations and Inspirations
Designing a master bedroom en suite bathroom requires careful planning and consideration. Several factors come into play‚ including the available space‚ your budget‚ and your personal preferences. Before diving into specific design elements‚ it’s crucial to address the practical aspects of the project.
- Space Allocation: How much square footage can be dedicated to the en suite? This will dictate the layout and the types of fixtures you can incorporate.
- Plumbing and Electrical: Existing plumbing and electrical lines can significantly impact the design. Consider the cost and complexity of relocating these utilities.
- Ventilation: Proper ventilation is essential to prevent moisture buildup and mold growth. Ensure adequate ventilation through windows or a powerful exhaust fan.
- Lighting: Layered lighting is key. Combine ambient‚ task‚ and accent lighting to create a functional and inviting space.
Popular Design Styles for Master Bedroom En Suites
Once you’ve addressed the practical considerations‚ you can begin exploring different design styles. Here are a few popular options:
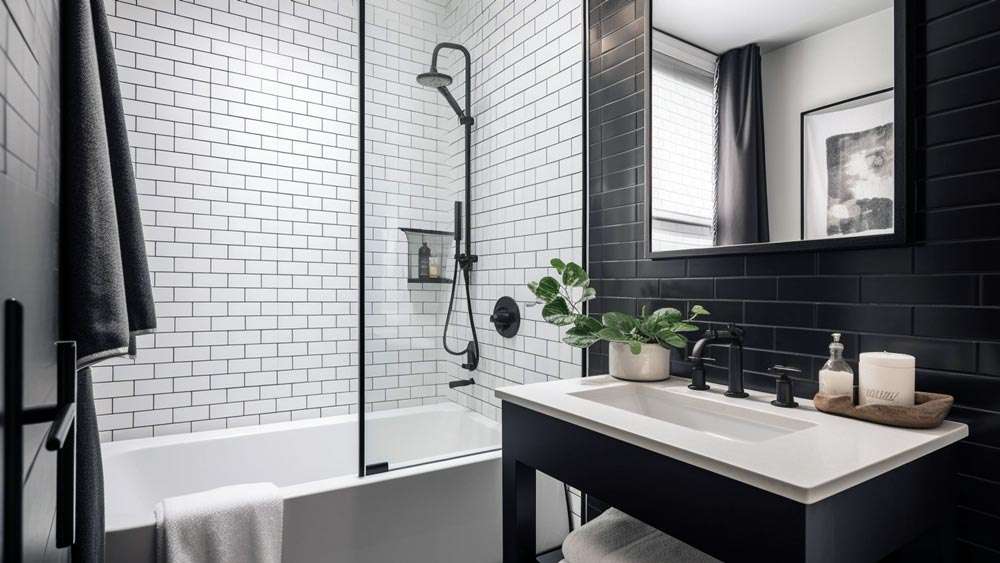
Modern Minimalism
Clean lines‚ neutral colors‚ and a focus on functionality define modern minimalist en suites. Think floating vanities‚ walk-in showers with frameless glass‚ and sleek fixtures.
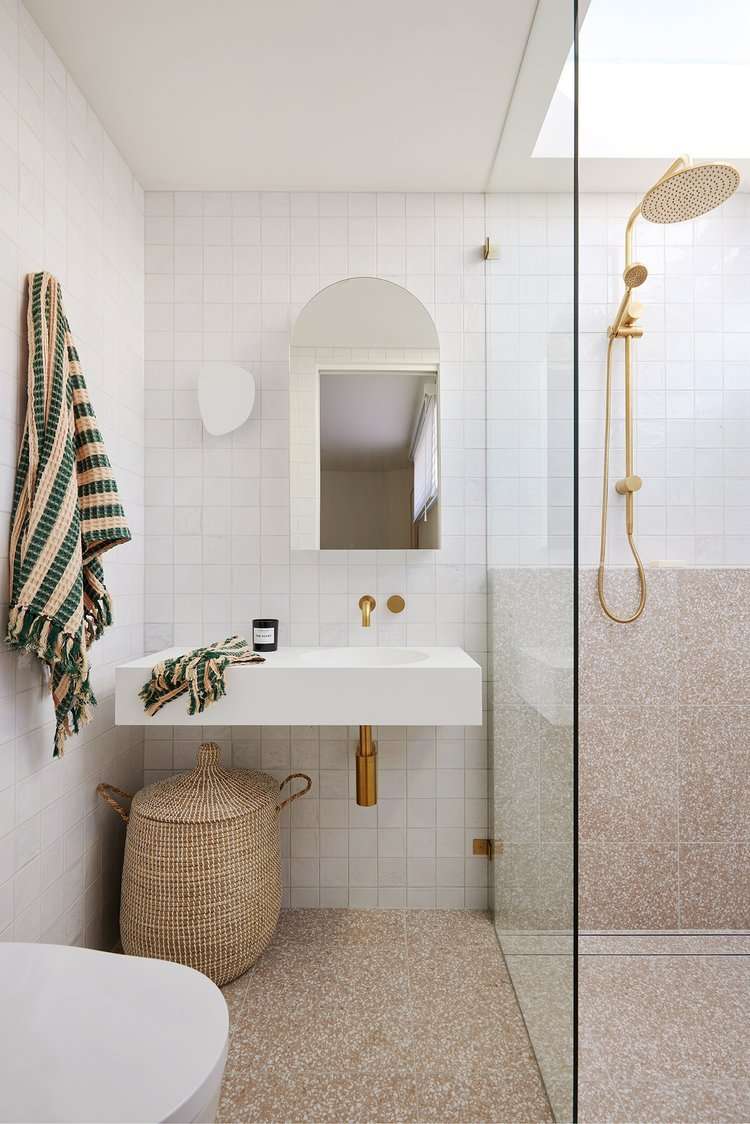
Luxurious Spa Retreat
Transform your en suite into a spa-like oasis with a soaking tub‚ rainfall showerhead‚ and heated towel rack. Incorporate natural materials like stone and wood for a calming ambiance.
Rustic Charm
Bring warmth and character to your en suite with rustic elements like reclaimed wood‚ exposed brick‚ and vintage-inspired fixtures. Consider adding a freestanding clawfoot tub for a touch of old-world charm.
Contemporary Elegance
Blending modern and traditional elements‚ contemporary elegant en suites offer a sophisticated and timeless appeal. Opt for classic fixtures with a modern twist‚ such as a pedestal sink with a sleek faucet.
Key Elements to Consider
No matter your chosen design style‚ certain elements are essential for creating a functional and beautiful en suite bathroom.
- Vanity: Choose a vanity that provides ample storage and complements your overall design. Consider a double vanity if space allows.
- Shower/Tub: Select a shower or tub that meets your needs and preferences. A walk-in shower is a popular choice for its accessibility and modern look.
- Toilet: Opt for a low-flow toilet to conserve water. Consider a wall-mounted toilet for a sleek and space-saving design.
- Flooring: Choose a durable and water-resistant flooring material‚ such as tile or stone.
Comparative Table: Flooring Options
| Flooring Material | Pros | Cons |
|---|---|---|
| Tile | Durable‚ water-resistant‚ variety of styles | Can be cold‚ slippery when wet‚ grout requires maintenance |
| Stone | Elegant‚ durable‚ natural beauty | Expensive‚ can be porous‚ requires sealing |
| Vinyl | Affordable‚ water-resistant‚ easy to install | Less durable than tile or stone‚ can look cheap |
Ultimately‚ designing a successful master bedroom en suite bathroom is a personal journey. By carefully considering your needs‚ preferences‚ and budget‚ you can create a space that is both functional and beautiful. The best advice is to take your time‚ research different options‚ and don’t be afraid to experiment with different styles and materials. With a little planning and creativity‚ you can transform your bathroom into a private oasis that you’ll love for years to come. Remember‚ the best master bedroom en suite bathroom designs are those that truly reflect your individual style and enhance your daily life.
Now that you have a solid foundation‚ let’s delve into some advanced tips to elevate your master bedroom en suite bathroom from functional to fabulous. Think beyond the basics and consider how small details can significantly impact the overall ambiance and usability of the space. These are the elements that truly personalize your en suite and make it a haven you’ll cherish.
ELEVATING YOUR EN SUITE: ADVANCED DESIGN TIPS
Beyond the core components‚ several key elements can enhance both the functionality and aesthetic appeal of your en suite bathroom. These are the finishing touches that transform a standard bathroom into a personalized sanctuary.
SMART TECHNOLOGY INTEGRATION
Consider incorporating smart technology to enhance convenience and luxury. Think beyond just smart lighting; explore options like:
– Smart Mirrors: Mirrors with built-in displays showing weather‚ news‚ or allowing you to control other smart devices.
– Digital Shower Systems: Precisely control water temperature and pressure with digital interfaces‚ and even save your preferred settings.
– Heated Floors: Program the thermostat for ultimate comfort‚ especially during colder months.
– Voice-Activated Controls: Control lighting‚ music‚ and other features with simple voice commands.
THE POWER OF PERSONALIZATION
Don’t be afraid to inject your personality into the space. This is your private retreat‚ so make it a reflection of your individual style.
– Artwork: Introduce artwork that complements your color scheme and adds visual interest. Choose pieces that are waterproof or suitable for humid environments.
– Plants: Add greenery to create a calming and refreshing atmosphere. Opt for moisture-loving plants like ferns or orchids.
– Accessories: Select stylish accessories like soap dispensers‚ toothbrush holders‚ and towel racks that enhance the overall aesthetic.
– Custom Storage Solutions: Design custom shelving or cabinets to maximize storage space and keep your belongings organized.
MAXIMIZING NATURAL LIGHT
If possible‚ maximize the amount of natural light in your en suite. Natural light can brighten the space‚ improve your mood‚ and reduce the need for artificial lighting.
– Skylights: Consider adding a skylight to bring in natural light from above.
– Larger Windows: If privacy allows‚ opt for larger windows to let in more light. Use frosted glass or blinds for added privacy.
– Light-Reflecting Surfaces: Use light-colored paint‚ mirrors‚ and glossy surfaces to reflect light around the room.
FOCUSING ON SUSTAINABILITY
Consider incorporating sustainable design elements to reduce your environmental impact and save money on utility bills.
– Low-Flow Fixtures: Install low-flow showerheads‚ faucets‚ and toilets to conserve water.
– Energy-Efficient Lighting: Use LED lighting‚ which consumes less energy and lasts longer than traditional light bulbs.
– Sustainable Materials: Choose sustainable materials like bamboo flooring‚ recycled glass tiles‚ or reclaimed wood.
COMPARATIVE TABLE: SHOWER HEAD OPTIONS
Shower Head Type
Pros
Cons
Standard Shower Head
Affordable‚ easy to install
Can be less efficient‚ limited features
Rainfall Shower Head
Luxurious experience‚ wide coverage
Can use more water‚ may require higher water pressure
Handheld Shower Head
Versatile‚ great for cleaning and rinsing
Can be less powerful‚ requires a holder
Dual Shower Head
Offers multiple spray options‚ customizable experience
More expensive‚ may require professional installation
Remember to consult with professionals‚ such as interior designers and contractors‚ to ensure your vision is executed flawlessly. They can offer valuable insights and help you avoid costly mistakes. With careful planning and attention to detail‚ you can create a master bedroom en suite bathroom that is not only beautiful but also functional and sustainable. The possibilities for master bedroom en suite bathroom designs are truly endless‚ allowing you to craft a space that perfectly suits your lifestyle and preferences. Embrace the design process‚ enjoy the journey‚ and create a bathroom you’ll love for years to come!